As a new parent, one of the most important things you need to do to protect your baby’s developing immune system is to keep their feeding equipment spotlessly clean. While sterilization of baby bottles is no longer necessary in most cases, it’s still important to know how to do it properly when you need to. And the good news is that you don’t need any fancy equipment to sterilize your baby’s bottles. In this post, we’ll show you how to sterilize baby bottles on a stove, using the boiling method. So, keep reading to ensure your baby’s feeding equipment stays germ-free and safe.
Importance of sterilizing baby bottles
It’s important to know the importance of sterilizing baby bottles before you begin bottle feeding your little one. Sterilizing helps to eliminate bacteria that might be present in the feeding equipment, which can be harmful to babies who are still building up their immune systems. This is especially important in the first year of life when they are most vulnerable to infections. Sterilizing all feeding equipment, including bottles, teats, and screw caps, helps to reduce the chances of your baby getting sick. Milk is the perfect medium in which bacteria can grow, which is why it’s crucial to sterilize all feeding equipment properly. This practice is also required until the baby is 12 months old. It may seem like a task, but it’s a small price to pay to ensure your baby’s health and well-being.
Outdated practice of sterilizing
In the past, parents were advised to sterilize their baby bottles regularly. However, this outdated practice is no longer considered necessary unless the baby is under three months old or has health problems. While it is still important to thoroughly clean bottles and accessories, using heat or chemicals to kill bacteria is not always required. In fact, some experts now suggest that sterilizing too frequently may actually harm the baby’s developing immune system by preventing exposure to harmless bacteria and reducing antibody production. Instead, simple cleaning with hot water and soap is often sufficient. Ultimately, parents should consult with their pediatrician and choose a sterilization method that works best for their needs and budget. As with any aspect of parenting, it’s important to stay informed and make decisions based on the latest research and recommendations.
Situations when sterilizing is necessary
Although sterilizing baby bottles isn’t always necessary, there are certain situations when it’s important to do so. If you’re using borrowed or second-hand bottles, for example, it’s critical to sterilize them before giving them to your child for the first time. The same goes for bottles that have been used for older siblings in your own home. Additionally, if your baby was born prematurely or has a weakened immune system, sterilization is particularly important, according to the Centers for Disease Control and Prevention (CDC). If you don’t have access to clean drinking water or if you’re traveling in a country with questionable water, it’s also important to sterilize your baby’s bottles often to avoid harmful microbes. Additionally, if you’re concerned about any lingering germs or bacteria on your child’s bottles, sterilizing them will certainly put your mind at ease. It’s important to choose a sterilization method that works best for you and your budget.
How often to sterilize
When it comes to how often to sterilize baby bottles, it really depends on your personal circumstances. If you live in an area with clean drinking water and you’re using brand new bottles, you only need to sterilize them once before initial use. However, if you’re using second-hand bottles or you’re concerned about your baby’s health due to prematurity or a weakened immune system, then sterilizing more often may give you peace of mind. The Centers for Disease Control and Prevention (CDC) recommends sanitizing baby bottles at least once a day if you’re not using a dishwasher with a heated drying cycle. It’s important to note that regular sterilization can damage the bottle and possibly allow chemicals to leach into the milk, so it’s best to avoid excessive sterilization. Remember, every family’s needs are different, so do what feels right for you and your baby.
II. Boiling Method
Steps for sterilizing with boiling water
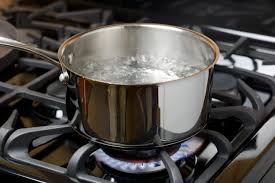
Sterilizing baby bottles with boiling water is a simple and effective way to ensure that your baby’s bottles are free from harmful germs and bacteria. To begin, fill a pot with enough clean water to cover the bottles, and place them upside down in the water, making sure there are no air bubbles. Bring the water to a boil and let the bottles boil for five minutes, making sure to check manufacturer guidelines for any variations. Once the time is up, turn off the heat and carefully remove the bottles using tongs, placing them on a clean, dry dishcloth to air dry. It’s important to note that boiling water is safe for use on plastic bottles, making it a versatile method for sterilization. By following these simple steps, you can rest easy knowing that your baby’s bottles are safe and clean. So, if you’re looking for an easy and cost-effective way to sterilize your baby’s bottles, boiling water is definitely the way to go!
Why boiling method is effective
The boiling method is an effective way to sterilize baby bottles. It is a simple and inexpensive process that can be done easily on a stove. Boiling water at a high temperature for five minutes can kill most germs and bacteria on baby bottles, making them safe for use. The heat generated by boiling water also helps to break down any residue or milk left in the bottles, leaving them clean and fresh for the next use. This method works well for all types of bottle materials, including glass, silicone, and plastic. It is also a great option for parents who do not want to invest in specialized equipment for sterilizing bottles. When boiling baby bottles, it is important to follow manufacturer guidelines and use tongs to remove the bottles from the water to avoid burns. Overall, boiling water is a simple and effective way to ensure your baby’s feeding equipment is safe and clean.
Tips for using boiling method
When it comes to using the boiling method to sterilize baby bottles, there are a few tips you should keep in mind. First and foremost, make sure to use a large, clean pot and enough water to fully submerge the bottles and their parts. It’s also important to remove any air bubbles from the bottles to ensure complete sterilization. Boil the bottles for at least five minutes, but be sure to check the manufacturer’s guidelines for any variations. Once finished, use tongs to remove the bottles and place them on a clean, dry dishcloth to air dry. To prevent damage, avoid using abrasive cleaners or scrubbers on the bottles and their parts. Finally, don’t forget that sterilization is only one step in proper bottle hygiene. Regular cleaning with hot, soapy water before and after use is also important to ensure your baby’s safety and good health. By following these tips, you can effectively sterilize your baby’s bottles and give yourself peace of mind.
III. Other Sterilizing Methods
Microwave sterilization
Microwave sterilization is a quick and efficient way to clean your baby’s feeding bottles. It uses heat in the form of steam to sterilize the bottles and nipples, eliminating any bacteria or germs that may be lurking inside. The process is relatively easy and can be done in just a few minutes. Start by washing all components of the bottle separately in warm soapy water, making sure there are no remnants of milk or any other food product left behind. Once everything is clean, fill the bottle halfway with water and place it upright in the microwave. Alternatively, you can place all the components, including the bottle, in a microwave-safe bowl. Microwave on high for one to two minutes and make sure to let everything cool before removing it from the microwave. While this method is safe, it’s important to clean your microwave thoroughly before using it to sterilize baby products to ensure it’s free from any harmful particles.
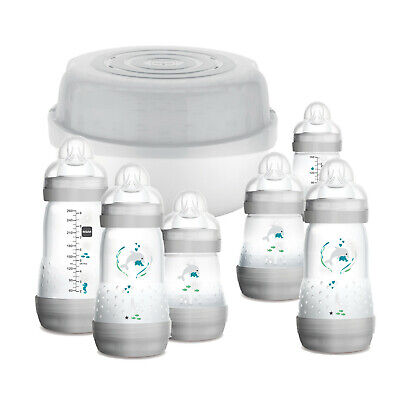
Electric steam sterilizer
One popular method for sterilizing baby bottles is to use an electric steam sterilizer. These devices use hot steam to kill bacteria and germs, without the use of chemicals or boiling water. They’re an excellent option for parents who want a quick and easy way to sterilize bottles, without the hassle of boiling a pot of water. Plus, some models even have enough space to sterilize multiple bottles and accessories at once. However, keep in mind that electric steam sterilizers require a power source, so they may not be the best option for traveling or when you’re on-the-go. Additionally, some models can be pricey, so make sure to research and compare different brands before making a purchase. Overall, electric steam sterilizers are a great choice for parents who want a convenient and effective way to keep their baby’s bottles clean and germ-free.
UV sterilizer
Have you heard of UV sterilizers for baby bottles? It may sound like a futuristic concept, but it’s actually a very effective way to sanitize your baby’s feeding equipment without heat, steam, or chemicals. UV light can kill viruses and 99.9% of harmful bacteria, making it a fuss-free option for busy parents. The short-wavelength ultraviolet light, or UV-C light, works by penetrating the cellular wall of microorganisms and deactivating bacteria on the surface of the object. Hospitals, industrial kitchens, and laboratories use UV light to maintain clean and hygienic environments, and now you can use it to clean your baby’s bottles and pacifiers too! It’s important to sterilize your baby’s feeding equipment regularly, especially in their first year of life when their immune system is still developing. Whether you choose to use boiling water, electric steam sterilizer, microwave sterilization, or UV sterilization, the goal is to protect your little one from harmful bacteria and germs. So, pick the method that works best for your needs and budget, and keep your baby’s feeding equipment clean and safe.
Chemical sterilization
Chemical sterilization is another method for sterilizing baby bottles that uses a solution that kills bacteria and viruses. This method is particularly useful for busy parents who may not have the time or resources to use the boiling or steam sterilization methods. One option is to use a sterilization tablet or sterilization solution to disinfect your baby’s bottles. With these methods, you simply add the tablet or solution to a container of water and let the bottles soak for a specified period of time. Another option for chemical sterilization is a sterilizing solution that you add to the water in a specialized sterilizing machine. Some parents prefer the chemical sterilization method because it is quick, convenient, and effective. However, it is important to carefully follow the instructions for the specific solution or tablet you are using to avoid harming your baby or damaging the bottles. Always ensure that the bottles are rinsed thoroughly after chemical sterilization to remove any residue.
V. When to Stop Sterilizing
Guidelines for how long to sterilize
The guidelines for how long to sterilize baby bottles can vary depending on the method you choose and the manufacturer’s instructions. When using boiling water, it’s recommended to submerge the bottles for at least five minutes, but some manufacturers may suggest a different length of time. With microwave sterilization, the process can take as little as two minutes, but again, it’s important to follow the specific instructions for your equipment. Chemical sterilization solutions typically require a minimum of 30 minutes of contact time with the equipment. Electric steam sterilizers typically take around 6-8 minutes to complete a cycle. The important thing to remember is to always follow the manufacturer’s guidelines for the specific equipment you are using, and to change the sterilizing solution regularly. And once baby is older than three months or if you notice any damage to the bottles or accessories, it’s no longer necessary to continue sterilizing regularly. Ultimately, it’s up to you to decide what feels right for your family and baby’s needs.
Signs of damage in bottles and accessories
It’s important to regularly inspect your baby’s bottles and accessories for any signs of wear and tear that may compromise their safety. Glass bottles with cracks or chips should be immediately thrown away as they may break with the heat. Similarly, plastic bottles with splits, cracks, or any warping should also be discarded as they can leach harmful chemicals into the milk. Bottle nipples should be replaced if they show any noticeable wear and tear as they can be a choking hazard for your baby. It’s recommended to inspect baby bottles and accessories before each use to ensure their safety. Always prioritize your baby’s health and safety by replacing damaged items promptly to avoid any risk of infection or other health issues. A little inspection can go a long way in keeping your little one healthy, happy and safe.
When to replace nipples
It’s important to replace bottle nipples regularly, as they can show signs of wear and tear over time. You should inspect nipples every three months to look for signs of damage, such as cracks or tears. If you notice any damage or if the nipple has become stretched or misshapen, it’s time to replace it. Damaged nipples can cause leaks, which can be messy and frustrating for both you and your baby. In addition, worn-out nipples can make feeding uncomfortable for your little one. It’s also a good idea to replace nipples if your baby has been sick or if the nipple has been dropped on the floor or otherwise contaminated. When selecting new nipples, make sure to choose the right size and shape for your baby’s age and feeding preferences. Following these guidelines will help ensure that your baby’s feeding experience is safe and comfortable.
Pick a method that works best for your needs and budget.
When it comes to sterilizing baby bottles, the method you choose should be based on your needs and budget. There are plenty of options from boiling water to UV sterilizers, and each has its pros and cons. For example, boiling water is an affordable and effective method that can be done with just a pot and stove, while electric steam sterilizers can be more expensive but offer convenience and speed. It’s important to consider any potential damage the method may cause to your bottles or accessories, and to follow manufacturer guidelines for safe and effective sterilization. Ultimately, the goal is to keep your baby’s bottles free from harmful bacteria and germs, so choose a method that fits your lifestyle and preferences. With a little research and consideration, you can easily find a sterilization method that works best for you.
Is it safe to sterilize baby bottles in boiling water?
While sterilization is not necessary for every use of your baby’s bottles, it is recommended before using them for the first time to ensure they are germ-free. Sterilization is also beneficial if you’re using borrowed or second-hand bottles, if your baby was premature or has health issues, or if you don’t have access to clean drinking water.